
Virtual Private Network (VPN) software is a crucial tool for online security and privacy. With numerous VPN services available, selecting the one that best fits your needs is a vital step toward a secure internet experience. Once you’ve chosen your VPN service, the next question is: How do you connect to VPN on Mac? If this is your first time using a VPN on your Mac, you’ll need the correct information to get started.
In this blog, we’ll provide a detailed, step-by-step guide to connecting your Mac to a VPN. Before we delve into the technical steps, we’ll explore the benefits of using a VPN on a Mac. We’ll focus on how a VPN can safeguard your online identity and protect your connection from various threats.
Our Top Favorite VPN Products: Check Out Now!


How to Connect to VPN on Mac
You have already decided which Virtual Private Network (VPN) service you are going to use on your Mac. You have carefully familiarized yourself with the features and plans of service. The application has also been downloaded and installed on Mac. It is about time to establish a connection to a VPN on your Mac.
There are two ways to establish a connection to a VPN. First, you can do it directly using the Mac OS built-in networking framework system. Second, you can use the VPN service application to establish the connection with your Mac.
How To Connect VPN Without Using Any VPN App?
The process to establish the connection is straightforward and user-friendly. Here is how to connect your Mac with a VPN without any app:
- First, look at the upper left corner of your Mac home screen. You will see an Apple icon. Just click on it.
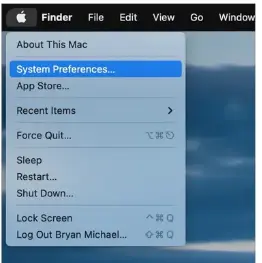
- You will see a list of options. Click on the System Preferences option.
- Inside there, you will see lots of icons representing different functions. Click on the Network icon.
- Look at the bottom left side of your screen. Click on the lock icon.
- If you are asked to log in, do so at this point. However, a few more steps are required to establish the connection.
- You will see the “+” sign in the bottom left corner. Click on it.
- You will see a simple drop-down list. From inside the list, click on the VPN option.
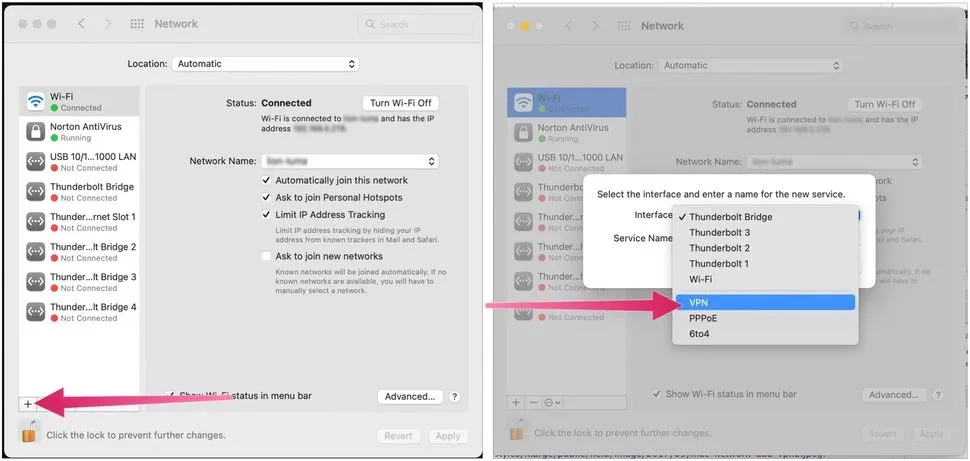
- You will see the VPN Type option, which your service provider provides. Each VPN has different options, such as L2TP over IPSec. In our example, we will choose L2TP over IPSec (Layer Two (2) Tunneling Protocol).
- You need to know the options provided by your VPN service.
- Next, mention the type inside the Service Name.
- First, both VPN Type and Service name options are included. Click on the Create button.
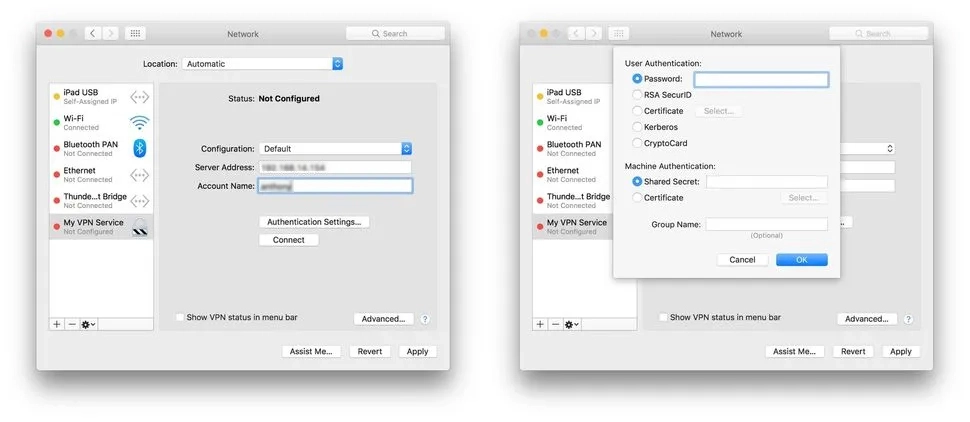
- Type the Server Address provided to you by the VPN service provider. It could be any of these two options:
- IP Address, or
- Hostname
- Now, You need to type the Account Name. Your VPN service provider could also provide this.
- Click on Authentication Settings, which is a strong encryption setting that VPNs use for security and authentication.
- Inside, choose the User Authentication method, which again would be provided by your specific VPN service provider.
- User Authentication is a detail that helps you establish a secure account record.
- In our example, we used a Password as our authentication detail.
- Next, on the same page, you will see the Machine Authentication option. Your VPN service provider requires it.
- We choose Shared Secret in this option details.
- Finally, click on the OK button.
- If you want to make the “connection” process more accessible, then you should probably check the option called “Show VPN status in the menu bar.”
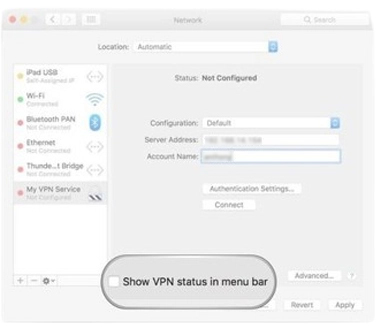
This will let you set up a quick access option for “enabling or disabling VPN connection” directly via your desktop. It will help automate the connection process so you don’t have to start all over again every time you try to connect to a VPN.
- Next to the “Show VPN status in the menu bar,” there is an option named advanced. Click on it.
- This option involves establishing an encrypted online connection. To do so, click check on the option “Send all traffic over VPN connection.”
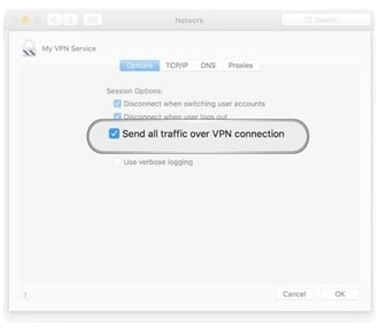
- There is an OK button at the bottom right corner. Click on it.
- Next, click the apply button again at the button in the right corner of the menu design.
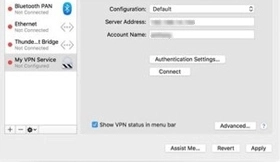
- Click on the “Connection” option. This will establish your VPN connection on your Mac, and you can continue using a fully secure and encrypted internet connection.
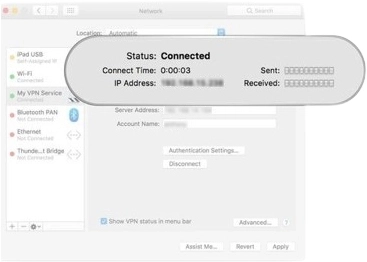
There you go! The connection to the VPN on Mac has been established. The process of connection was detailed, but it’s a small price to pay for the control and security it provides. Next time, you can directly connect or disconnect from the desktop without following through this lengthy process. It will make your experience a lot more fun and more accessible.
How To Connect VPN On Mac Through a VPN App?
There are various VPN services which provide applications to install on the personal systems. Some of these services include IPVanish, ExpressVPN, NordVPN, TunnelBear, and more. The benefit of these types of applications is that they automatically set up VPN settings without human interference. They are easy to connect and disconnect from your Mac device. To build a connection between a VPN and your Mac OS system, all you need to do is download the application from the app store and put in the credentials to sign in, and that’s it. The application is ready to serve. This technique has the highest level of efficacy due to being less time-consuming and highly effective.
Here are simple steps to follow in order to establish a connection to a VPN on your Mac:
- First, download the app on your Mac OS system. Go to the app store to find your favorite service application.
- Second, sign up. Provide your credentials to set up the account using the VPN application.
- Third, Sign in. Remember the email and password you provided for sign up, and use them here, too.
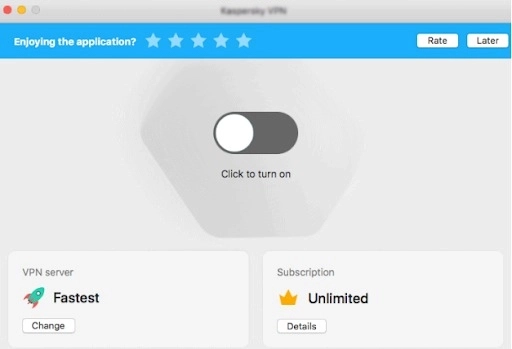
- Finally, when you sign in, you will find a power button. Click on it to establish a connection with the VPN.
Why Do You Need a VPN For Your Mac?
It Helps Secure Your Network Connection
VPN provides a highly secure connection to your Mac device. It helps give complete security against all kinds of online threats. When you are connected to a VPN, your network is directed towards a secure path. Furthermore, it blocks all access to your data for third-party actors, which, in turn, helps stop targeted advertisements. VPNs also block access to harmful websites that intend to harm users’ data without their knowledge, so having a VPN is essential, especially while navigating the Internet through public Wi-Fi.
It Helps Hide Your Personal Information.
One of the primary uses of a VPN is to provide access to a secure internet without exposing personal information. Some VPNs use a no-logs policy, which prevents them from collecting any private information of users. Even payment sources can be used anonymously these days. The main reason behind this is to provide you with peace of mind. Many bad actors, like hackers, try to steal users’ personal information to execute harmful activities on their behalf. For example, hackers can use the personal information of users to impersonate them to gain access to their private banking accounts or even more sensitive information. A VPN, with its highly secure protocol called 256-bit encryption, provides you with the peace of mind that your personal information is safe and secure.
To prevent this, a VPN uses a highly secure protocol called 256-bit encryption. This protocol makes it nearly impossible for any external source to penetrate the privacy of users’ data. Hence, this way, users can enjoy a safe and secure internet without the fear of being spied upon.
It helps Prevent Data Throttling.
This feature is related to your local internet service provider (ISP). At the beginning of each new month, you are provided with a specific data limit based on the package you have subscribed to. After a while, say 24 days, when you have surpassed a particular consumption of data limit, your ISP starts to slow down your service because your current speed of consumption would finish the data way before the new month begins. So, the ISP uses this technique called throttling to slow down the speed of his service on your connection.
However, if you use a VPN, you can easily escape the throttling problem and continue to enjoy the same average speed you originally had when you purchased the package. In this particular situation, a VPN helps you bypass the data cap without even knowing your local Internet Service Provider (ISP).
Access Geo-restricted Content
VPN has many unique features, one of which is providing access to geo-restricted content. There are specific streaming channels, and their libraries are only available in specific geographical locations. Despite the fact that streaming platforms are global, they deliberately put these restrictions on their content. It is the same thing with content libraries; they are also limited in access. VPN can help bypass artificial firewalls and unblock all the restrictions. You can access those geo-restricted content with the help of a VPN. However, since you have a different IP address belonging to the host country where those libraries are present, you might also have to buy subscription plans for the streaming services from those new countries. Otherwise, it is not possible to sign in to the account.
These restrictions are not limited to streaming platforms only; they also exist in different financial services, government official sites, and many more. Ultimately, in order to access them, you will need a VPN, or you won’t even be able to use them.
So, now you know that a Virtual Private Network usually provides helpful support. It creates a safe and protected environment for our data online and hides our identity from local ISPs and third-party actors who may use data to set target advertising.
Conclusion
The question of how to connect to a VPN on a Mac has a simple answer. Two different techniques are available that can be used to establish a connection between Mac OS and VPN. First, it uses a Mac OS built-in Networking Framework System. Second, the official VPN application is available via the app store. The former is a lengthy process; however, it provides complete security to users’ data. Later is simple and direct; it includes installation and sign-in process to be ready to establish a connection. Each technique has its fair share of advantages and disadvantages. This blog emphasized the “how to connect” part, and each part has been effectively highlighted for a better writing experience.
FAQs
Usually, antivirus programs block the VPN connection with your Mac for security reasons. Sometimes, multiple VPN applications installed on the Mac obstruct the connection. Make sure you are only using one VPN service. If there is more than one, delete unnecessary and keep the one you want to use on your Mac. Regarding the antivirus, you will need to turn it off so the connection can be established successfully.
You will need to follow a few simple steps to establish a connection between NordVPN and your Mac:
- First, download and install the service on your Mac.
- Open the NordVPN app (make sure you have signed in already)
- See the connect button. Click on it. (Don’t worry about the server; the VPN will do it automatically)
Firewalls are the main reason why a VPN causes problems establishing a connection with your Mac. Check the firewall settings carefully and verify that they are not causing the issues. If firewalls are the cause, then configure it to establish a VPN connection with Mac. Also, look for the ports in the settings and make sure they are open, allowing traffic to pass through the system without any problem. Once the amendments are done, restart the service.
There are several ways to verify if your Mac is connected to a VPN service.
- Check your IP address on the website online before connecting to any VPN. Once the VPN is established, check your IP address, and it won’t be the same. It proves you are now on a private network.
- Check your Internet speed before and after the VPN connection. There will be a slight drop in the speed, and your connection will be confirmed.
- You can also use a particular DNS leak tool to check your original IP address and the one provided by a private VPN connection. The difference will make it clear you are on a VPN server connection.