
You might have initially felt that setting up a VPN on a Mac would be daunting, especially if you’re a beginner. However, the reality is quite the opposite. Setting up a VPN on a Mac is a straightforward process. In this blog, we will attempt to answer your “How to use a VPN on Mac” and guide you through the steps, addressing all your concerns and making the process feel more manageable and less intimidating.
Our Top Favorite VPN Services: Check Out Now!


How To Use a VPN on Mac?
Setting up a VPN on a Mac involves a few simple steps. Below, we present an easy-to-understand mechanism to help you use a VPN on your Mac device.
Download the App or Extension
Since you have already subscribed to the VPN service from their official website, it is time to download the app or extension, both of which are provided by most of the top-performing VPN services.
The app for your Mac OS will be available on the official app store. It is the fastest service for downloading apps inside a Mac. However, some websites provide direct links for download on their official websites. In that case, you do not need to use the app store to download the VPN service.
Sign in the Mac VPN App
Before you start using the VPN for your Mac, you need to sign in. The process is simple; all you need to do is send an email and a password. If you still need to sign up for the account, sign up first. Use the sign-up email and password information to get into the app.
After signing in to your Mac VPN app, you will be required to set the application configurations. The first time when you log into the app, you will see a small popup message asking for your permission to add VPN configurations to your Mac OS system. Tap on the option “allow,” and maybe, for confirmation that you are providing the consent, you may be asked to reenter the password.
When you log in to the VPN app, make sure you click on remember the password feature; otherwise, after every little while, you will be required to put in your email and password to access the service. You can also do this by clicking on the Mac administrator password and clicking constantly allow button. This way, you won’t have to log into the app now and then.
We are still not done yet with “How to use a VPN on Mac.” Let’s keep learning.
Select Your Server Location Inside the Mac VPN
After successfully signing into the app, the best next step is to select a server location. Smart VPNs automatically connect you with nearby servers at the fastest speed, but you can also do it on your own.
Once you sign into the Mac app, you will be asked to choose a server. You are free to select a server from any location, local or international. The reason why VPNs have separate servers is security and privacy. It gives them the resources for unblocking content from different countries for streaming purposes, and you are way more protected this way. Servers also help hide your original IP address by replacing it with a different IP address belonging to a separate country from where you have established your VPN connection.
If you are connected to a server and want to change it after some time, the process for this is relatively easy. Open the app, and most of the time, you will get the server selection option right on the app’s home page. For example, NordVPN provides a server selection option at the top left corner of the VPN homepage. You can simply click on any location on the world map, and it will automatically establish your connection to the fastest servers from that specific location.
Customise the Mac App Settings Feature

Each VPN has a different set of settings features. You will have to learn the specific designs of settings and the terms available for them. Here, we will focus on addressing your primary concern of “how to use a VPN on Mac.” For example, NordVPN has a simple Settings feature that you can access by clicking on the top menu of the VPN homepage interface. Once you click on the option, you will find options like “Launch the app on computer startup,” and the other option includes Äuto-connect.” The auto-connect option means every time you click the connection option; the VPN will figure out which server to connect to on its own without you manually giving the input.
The basic features like security and privacy are automatically activated when you connect to a VPN. However, to further secure your Mac OS, you will have to check the settings option to activate those options. For example, split tunneling, kill switch, double VPN, and more. These are more advanced features that you have to activate manually from inside the VPN setting, depending on your needs and requirements.
We recommend using the kill switch from the get-going. It secures your connection in emergencies, for example, if you suddenly lose your connection with the internet or VPN on your Mac. In such moments, you want your data to be protected. You don’t want your local ISP or any spying force to get into private data. The kill switch is quite helpful in such moments as it shuts down everything immediately after you are disconnected from a VPN. Nobody can access your private browsing history due to this feature. Furthermore, it will remain secure until you reestablish your connection with the Mac VPN.
Connect Your VPN Using Encrypted and Safe Internet
The moment you connect your Mac with a VPN, you have access to a secure and encrypted internet. Your location and IP address have been changed from your original location, and nobody knows about it, not even your local ISP. Technically, you are not even in your own country while you are using the Internet through a VPN. You will be browsing from another country, and you can access anything available in that country, including the sites you couldn’t access without a VPN from your original location.
It’s the same thing with streaming; you can access new streaming platforms available in your new country’s location with the help of your new IP address and server connection. However, to enjoy services from the new location, you will need to sign up for all those accounts first.
How To Use VPN On Mac When There Is No App For It?
Most VPNs do not indeed have apps, especially for their Mac version, due to low user demand compared to other operating systems like Microsoft. In that case, you need to use the System Settings feature available inside your Mac OS. Inside the settings, you need to configure the network settings to activate your VPN.
Here is how it is done in simple steps:
- Like any service, you need first to sign up and create an account on the platform.
- While signing, you need an email and password. Save this information for later processing.
- Open the Mac System Settings and choose a specific Network you like to use.
- The drop-down menu is in the bottom left corner. Click on “Add VPN Configuration.” Choose your preferred VPN type and service name prescribed by your VPN service provider.
- Remember: The settings in the old Mac OS version are quite different. You need to click on the interface first and then choose the service from the various options provided.
- You will need to enter the settings for your chosen VPN service.
- For example, inside the server address field, you need to enter the server information.
- You need to mention the username that the VPN provider gave you inside the account name. (It is unique and can’t be replicated.)
- System Settings also has some advanced options, such as sending all your traffic over a VPN connection for extra security purposes.
- Another reason to use this feature is to ensure that all the apps inside your Mac are routed through the VPN connection. You can also choose to have only some of the apps use this feature.
- Now, click on the “Create” button.
- Here, you need to mention your password for permission to add new changes to your settings.
- After completing your confirmation, go to the System Settings once again and click on the “Control Centre” option. Then scroll down the menu bar and stop when you see “VPN.”
- There is a pop-up menu alongside the VPN. Choose the “Show VPN status in menu bar” and click ok; it will take you out to the menu.
- Apply the changes, and you will see an icon in your menu bar representing VPN Service.
For further clarity, click on the official Apple Mac instructions for how to use a VPN on a Mac.
Here Is An Example Of How To Use ProtonVPN App On Mac OS
The Proton app is used on a macOS 10.12 system or higher. This applies to Mac OS, MacBook, Mac mini, iMac, Mac Pro, and so on.
Old generations of Mac OS systems will have to configure the OpenVPN system manually. However, you can configure macOS 10.11 and above manually using the IKEv2 or WireGuard protocols.
Install The Proton App On Your Mac
Apple lets you easily download apps from its official app store. However, to download apps from outside the store app, like in our case, we downloaded ProtonVPN from its official website, you need to add a few steps in your System Settings.
Here is how you do it:
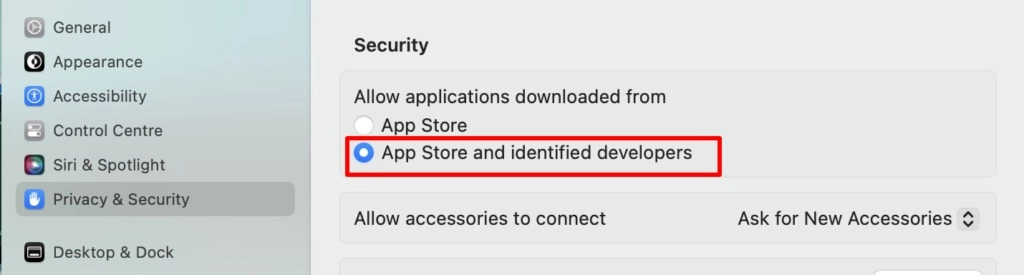
- Open the Settings option
- Click on the Privacy & Security option
- Click on the Security option
- Go to the Download application form and then select App Store and Identified Developers.
Process to Download ProtonVPN:
- Download the app from their official website.
- You need to manually drag the Proton VPN app to your application folder.
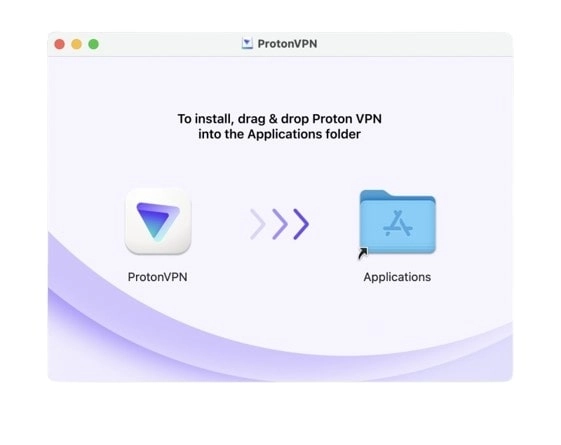
- Now, double-click on the ProtonVPN icon.
- Click open the confirmation request.
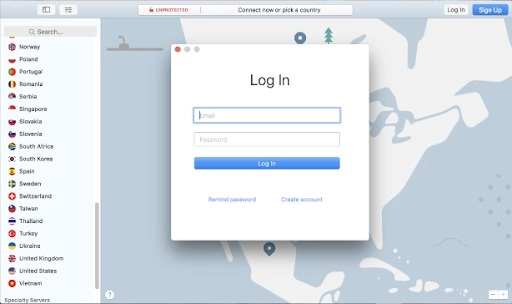
- If you haven’t already, sign in to your Proton VPN app and then sign up. Remember the email and password. They are the key to accessing the service in the future.
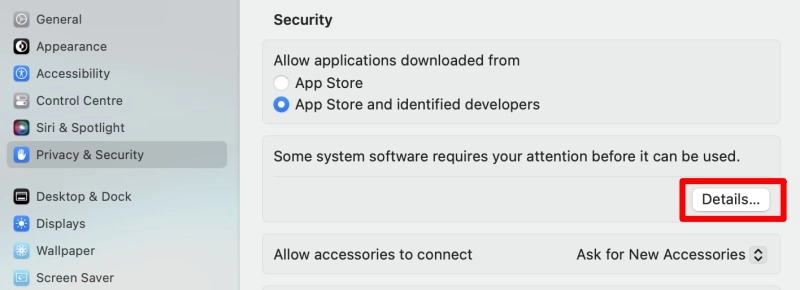
- The first time using the app, you will get a “System Extension Blocked Notification like this one:
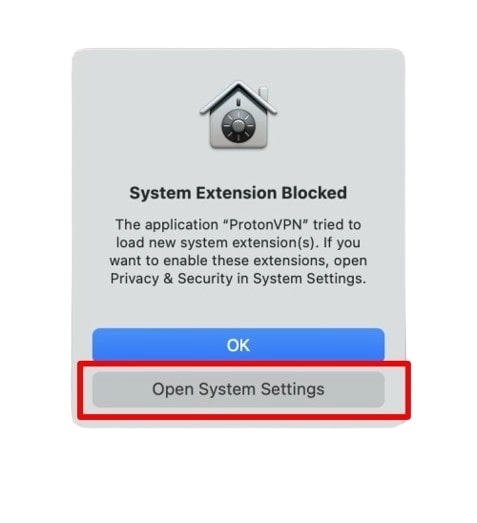
- Open the Settings option. Click on Security, and inside it, click on “Some System software requires your attention before it can before it can be used.” Click on the details option.
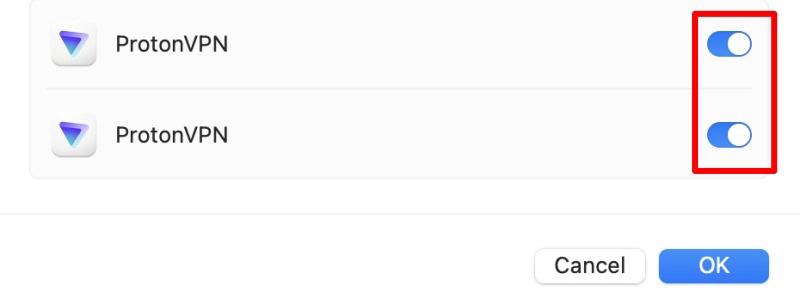
- To get into the option, you need to verify your identity using Touch ID or password.
- Now, toggle “on” switches and then click “ok” at the bottom right corner.
- Now, all is done. Return to your ProtonVPN app. Open the app, and you will be presented with the option to take a tour of our features, which you can easily skip if you want.
Using ProtonVPN
- Quick Connect: Now that you are inside the ProtonVPN app, click on Quick Connect to connect with any server. This feature automatically connects you to faster services near your location. However, suppose you are using the accessible version of ProtonVPN on your Mac. In that case, you will probably be connected to servers from these few countries: the United States, the Netherlands, Japan, and Romania.
- Of course, you will have to “allow” VPN configuration first.
- At this point, you are connected to the VPN service, and it is ready for use.
- Connect to the Fastest Server: If you are a paid subscriber of Proton, you can manually select the fastest VPN from any of the service’s 90+ servers. To do so, hover over the country location and click; the algorithm will automatically connect you with the fastest VPN from that location.
- You can also connect to any specific server within a country. Click on the “V” button next to the country name.
There are a few special servers available, and they are labeled for what they stand for:
- Tor servers: Onion icon
- Streaming servers: play button icon
- P2P servers: Double-arrow icon
You will also be given advanced connection options, such as:
- Secure Core
- Ad blocked
- Kill Switch
- Split tunneling
Inside ProtonVPN, your preferred settings will be saved automatically and shown on VPN connection profiles. Among the saved data is your preferred server location, to which you will be connected every time you switch on the VPN.
These are the basic features you need to know before using ProtonVPN. Further, if you want to explore the VPN, we suggest visiting the app’s settings feature. There is a lot more to the process that you can learn by diving deeper into the system.
Final Remarks
There are a few simple steps involved in using a VPN on any Mac device. It is essential to carefully follow the steps required to establish a setup for VPN service. Once that setup is completed, the next important step involves the use of the service. The use of VPNs has its own set of challenges, which are carefully investigated and explained in the blog above. The VPN on Mac can be used via third-party applications or from network settings. Each process requires a different set of understanding and use applications. An example of Proton was also presented as a case study to learn how to use a VPN on a Mac practically. The guide was intended to help readers build their awareness about VPN services and their use on Mac in particular.
FAQs
The Mac does not have its own built-in VPN. You can either download a third-party VPN service on your Mac or use a Private Network to connect to a VPN service manually. The latter does not encrypt your network or hide your IP address from external sources.
You should check the top status bar on your Mac. If you are connected to a service, a black box with four grey lines and one white line appears. If you don’t see the black box, you are not currently connected to any VPN/proxy service.
Our top recommendation is NordVPN. It is highly secure and provides advanced encryption protocols for users’ data safety while online. Among its quality features include a top-notch streaming service and the fastest service thanks to the vast network of servers available worldwide.
Free VPNs like Proton provide quality security and privacy features. However, you don’t know much about the internal policy mechanism of most free service-providing VPNs. Their service scope is limited. The speed is not that great as well. The streaming is slow and tedious. There are always security concerns with these services. In short, there is always a risk of losing personal data and information using free VPNs.